Together, a friend and I outfitted the small staircase at Berlin's Chaos Computer Club with nice, shiny RGB-WW LED tape
for ambient lighting. This tape is like regular RGB tape but with an additional warm white channel, which makes for much
more natural pastels and whites. There are several variants of RGBW tape. Cheap ones have separate RGB and white LEDs,
which is fine for indirect lighting but does not work for direct lighting. Since we wanted to mount our tape in channels
at the front of the steps, we had to use the slightly more expensive variant with integrated RGBW LEDs. These are LEDs
in the 5050 (5.0mm by 5.0mm) form factor common with RGB LEDs that have a small section divided off for the white
channel. The red, green and blue LED chips sit together in the larger section covered with clear epoxy and the white
channel is made up from the usual blue LED inside a yellow phosphor in the smaller section.
Since we wanted to light up all of 15 steps, and for greatest visual effect we would have liked to be able to control
each step individually we had to find a way to control 60 channels of LED tape with a reasonable amount of hardware.
LED tape has integrated series resistors and runs off a fixed 12V or 24V constant-voltage supply. This means you don't
need a complex constant-current driver as you'd need with high-power LEDs. You can just hook up a section of LED tape
to a beefy MOSFET to control it. Traditionally, you would do Pulse Width Modulation (PWM) on the MOSFET's input to
control the LED tape's brightness.
Pulse Width Modulation
Pulse Width Modulation is a technique of controlling the brightness of a load such as an LED with a digital signal.
The basic idea is that if you turn the LED on and off much too fast for anyone to notice, you can control its power by
changing how long you turn it on versus how long you leave it off.
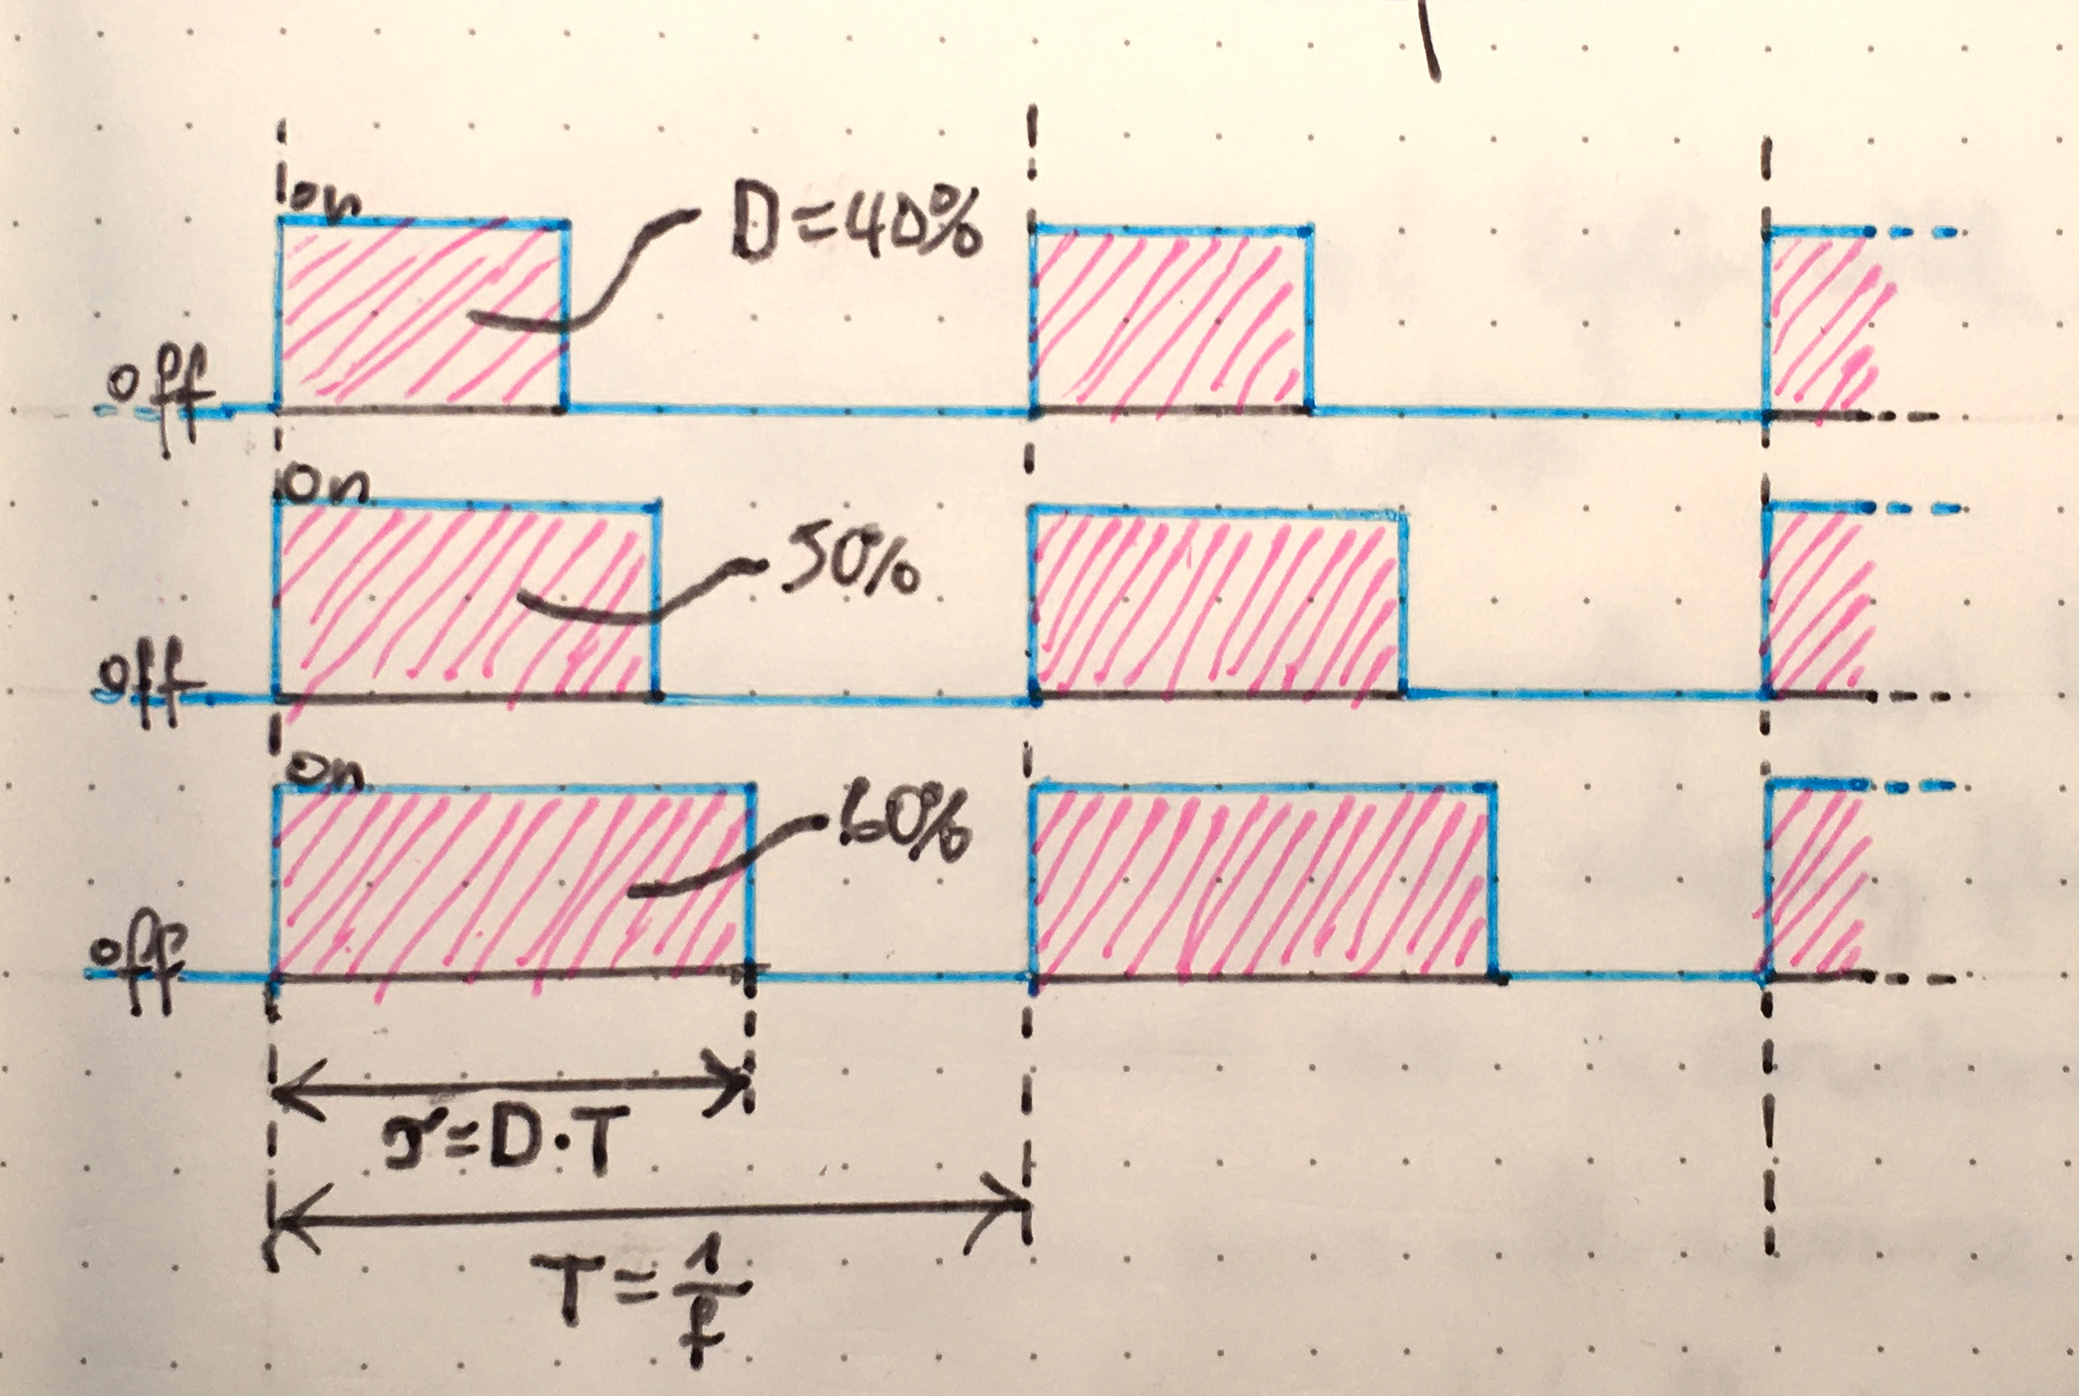
PWM divides each second into a large number of periods. At the beginning of each period, you turn the LED on. After
that, you wait a certain time until you turn it off. Then, you wait for the next period to begin. The periods are always
the same length but you can set when you turn off the LED. If you turn it off right away, it's off almost all the time
and it looks like it's off to your eye. If you turn it off right at the end, it's on almost all the time and it looks
super bright to your eye. Now, if you turn it off halfway into the cycle, it's on half the time and it will look to your
eye as half as bright as before. This means that you can control the LED's brightness with only a digital signal and
good timing.
 Waveforms of two PWM cycles at different duty cycles.
PWM works great if you have a dedicated PWM output on your microcontroller. It's extremely simple in both hardware and
software. Unfortunately for us, controlling 32 channels with PWM is not that easy. Cheap microcontrollers only have a
handful of hardware PWM outputs, so we'd either have to do everything in software, bit-banging our LED modulation, or
we'd have to use a dedicated chip.
Doing PWM in software is both error-prone and slow. Since the maximum dynamic range of a PWM signal is limited by the
shortest duty cycle it can do, software PWM being slow means it has poor PWM resolution at maybe 8 bits at most. Poor
color resolution is not a problem if all you're doing is to fade around the HSV rainbow, but for ambient lighting
where you really want to control the brightness down to a faint shimmer you need all the color resolution you can get.
If you rule out software PWM, what remains are dedicated hardware PWM controllers. Most of these have either of three
issues:
- They're expensive
- They don't have generous PWM resolution either (12 bits if you're lucky)
- They're meant to drive small LEDs such as a 7-segment display directly and you can't just hook up a MOSFET to their
output
This means we're stuck in a dilemma between two poor solutions if we'd want to do PWM. Luckily for us, PWM is not the
only modulation in town.
Binary Code Modulation
PWM is the bread-and-butter of the maker crowd. Everyone and their cat is doing it and it works really well most of the
time. Unbeknownst to most of the maker crowd, there is however another popular modulation method that's mostly used in
professional LED systems: Enter *Binary Code Modulation* (BCM).
BCM is to PWM sort of what barcodes are to handwriting. While PWM is easy to understand and simple to implement if all
you have is a counter and an IO pin, BCM is more complicated. On the other hand, computers can do complicated and BCM
really shines in multi-channel applications.
Similar to PWM, BCM works by turning on and off the LED in short periods fast enough to make your eye perceive it as
partially on all the time. In PWM the channel's brightness is linearly dependent on its duty cycle, i.e. the percentage
it is turned on. In PWM the duty cycle D is the total period T divided by the on period T_on. The issue with doing PWM
on many channels at once is that you have to turn off each channel at the exact time to match its duty cycle.
Controlling many IO pins at once with precise timing is really hard to do in software.
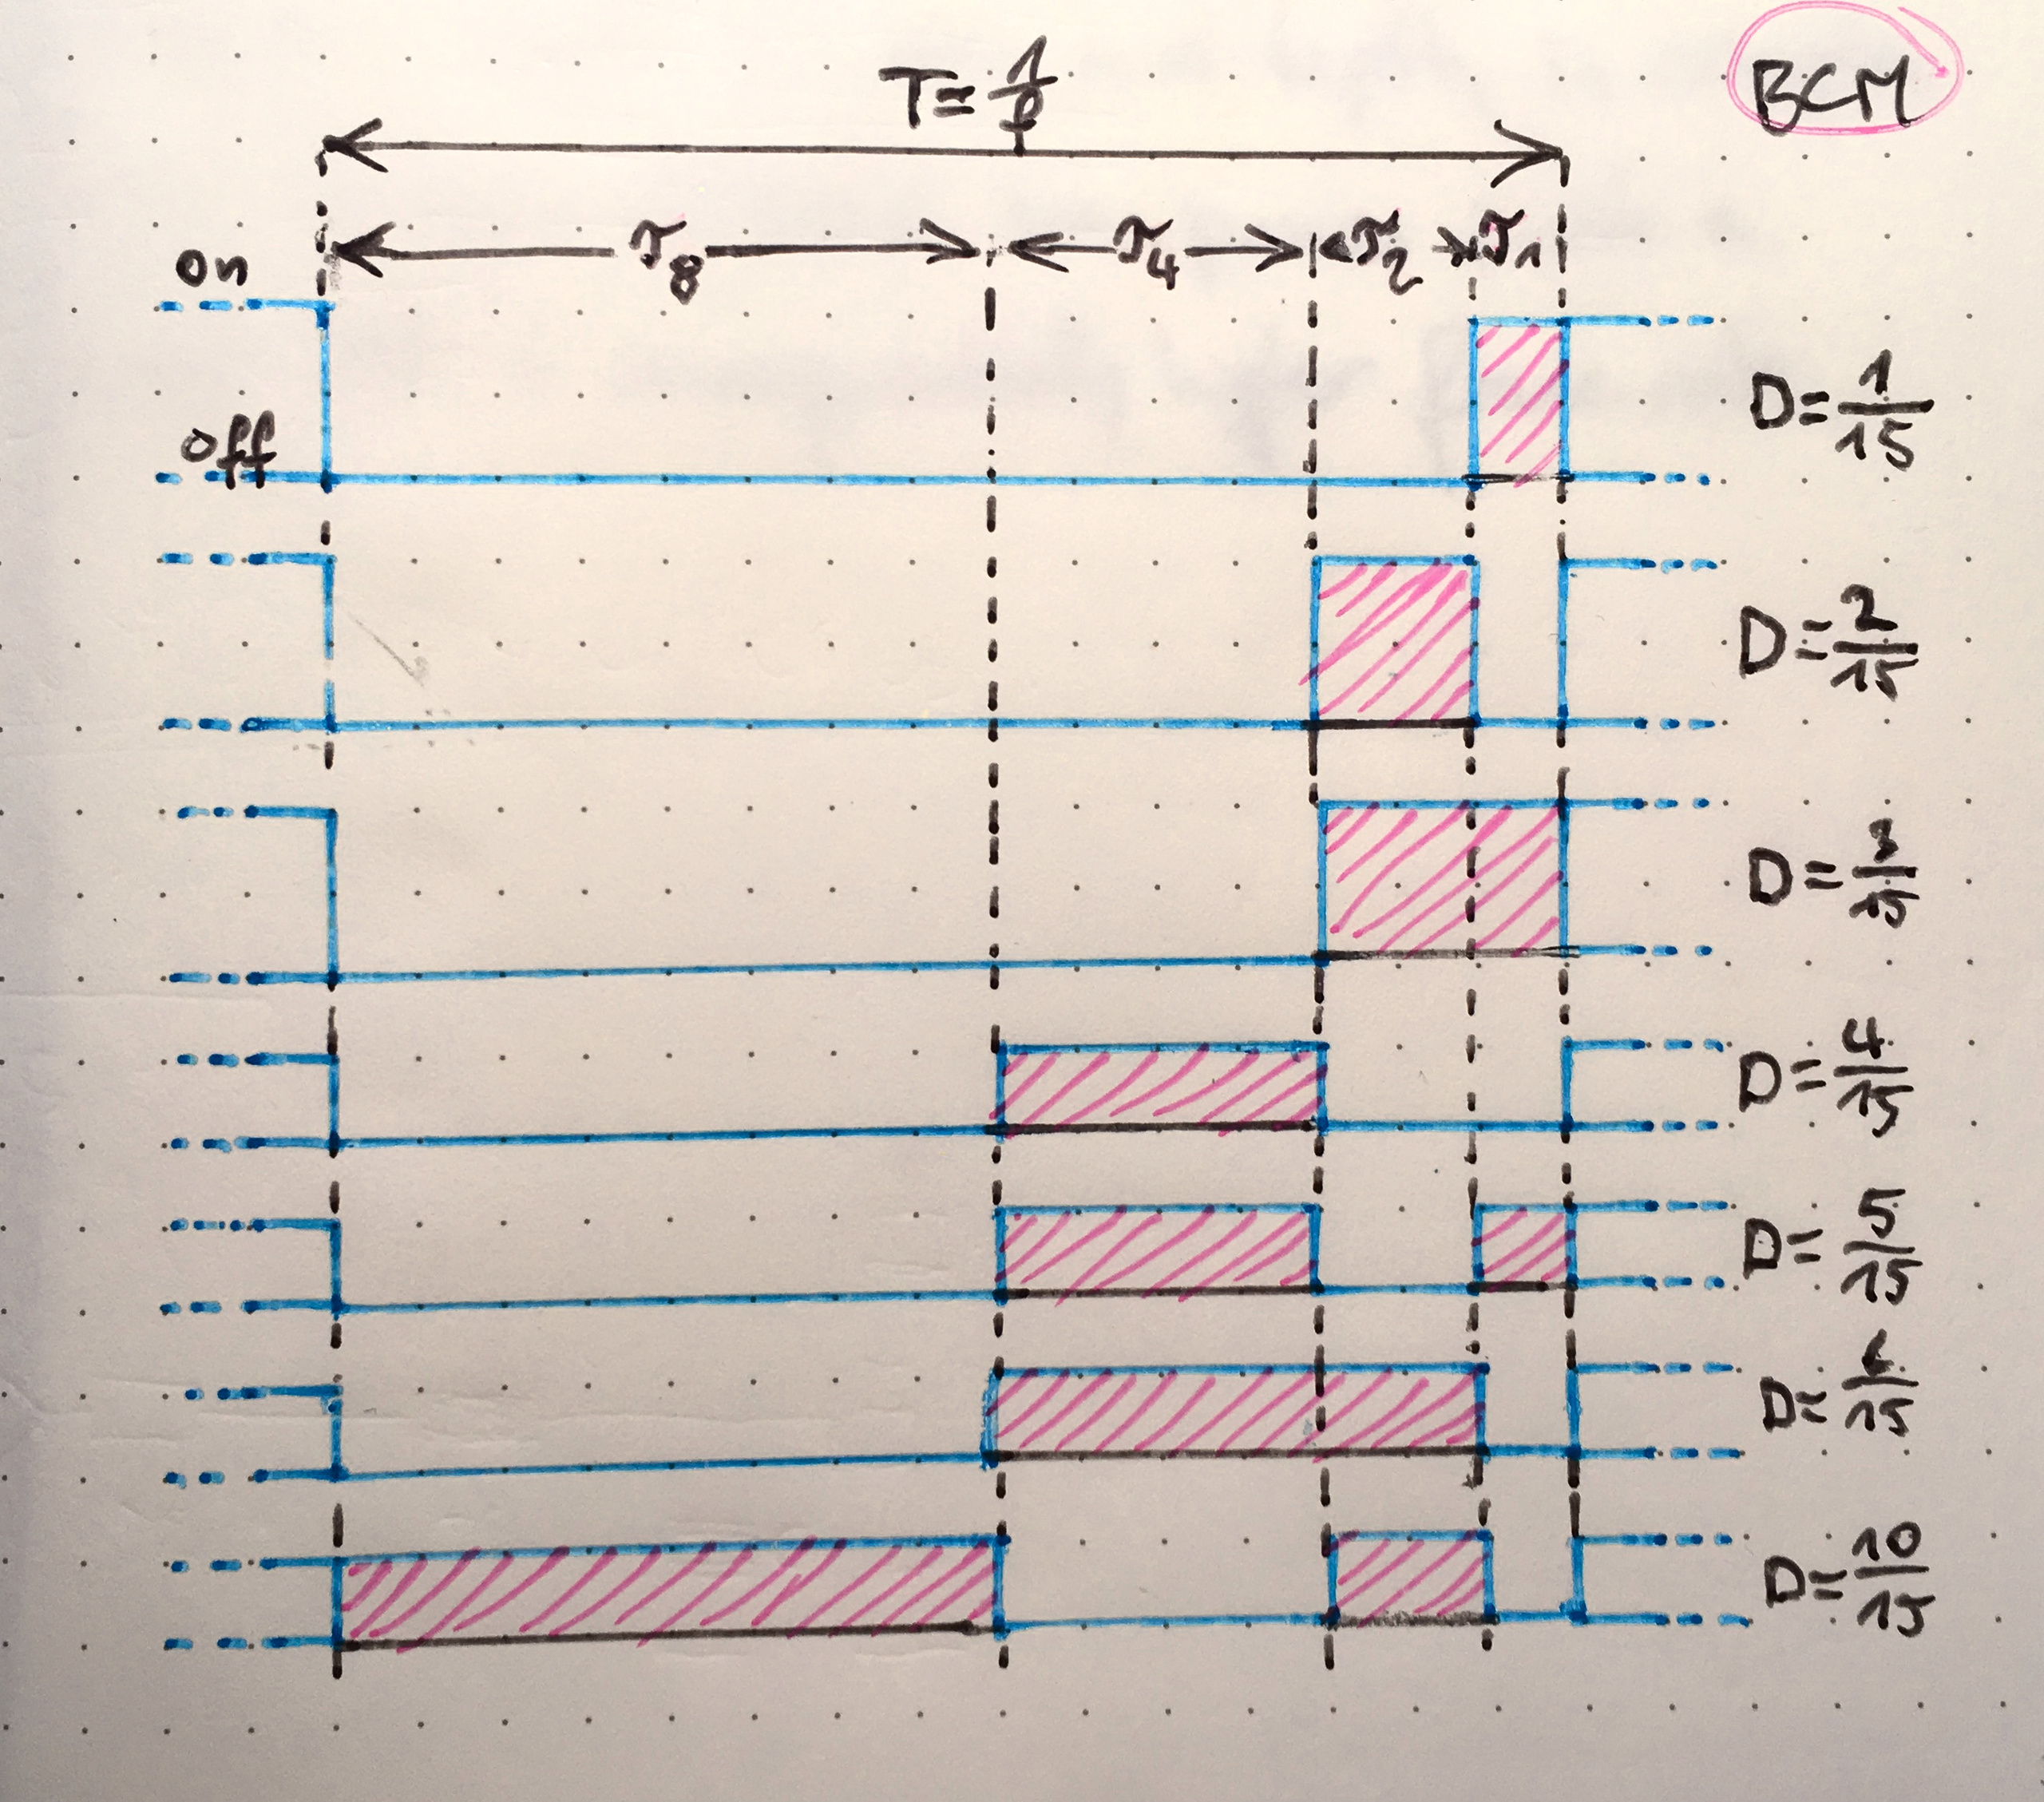
BCM avoids this by further dividing each period into smaller periods which we'll call bit periods and splitting each
channel's duty cycle into chunks the size of these bit periods. The amazingly elegant thing in BCM now is that as you
can guess from the name these bit periods are weighted in powers of two. Say the shortest bit period lasts 1
microsecond. Then the second-shortest bit period is 2 microseconds and the third is 4, the fifth 8, the sixth 16 and so
on.
 Waveforms of a single 4-bit BCM cycle at different duty cycles. This BCM can produce 16 different
levels.
Staggered like this, you turn on the LED for integer value of microseconds by turning it on in the bit periods
corresponding to the binary bits of that value. If I want my LED to light for 19 microseconds every period, I turn it on
in the 16 microsecond bit period, the 2 microsecond bit period and the 1 microsecond bit period and leave it off for the
4 and 8 mircosecond bit periods.
Now, how this is better instead of just more complicated than plain old PWM might not be clear yet. But consider this:
Turning on and off a large number of channels, each at its own arbitrary time is hard because doing the timing in
software is hard. We can't use hardware timers since we only have two or three of those, and we have 32 channels.
However, we can use one hardware timer to trigger a really cheap external latch to turn on or off the 32 channels all at
once. With this setup, we can only controll all channels at once, but we can do so with very precise timing.
All we need to do is to set our timer to the durations of the BCM bit periods, and we can get the same result as we'd
get with PWM with only one hardware timer and a bit of code that is not timing-critical anymore.
Applications of Binary Code Modulation
BCM is a truly wondrous technique, and outside of hobbyist circles it is in fact very widely known. Though we're using
it to control just 32 channels here, you can do much more channels without any problems. The most common application
where BCM is invariably used is any kind of LED screen. Controlling the thousands and thousands of LEDs in an LED
screen with PWM with a dedicated timer for each LED would not be feasible. With BCM, all you need to dedicate to a
single LED is a flipflop (or part of one if you're multiplexing). In fact, there is a whole range of ICs with no other
purpose than to enable BCM on large LED matrices. Basically, these are a
high-speed shift register with latched outputs much like the venerable 74HC595, only their outputs are constant-current
sinks made so that you can directly connect an LED to them.
Running BCM on LED tape
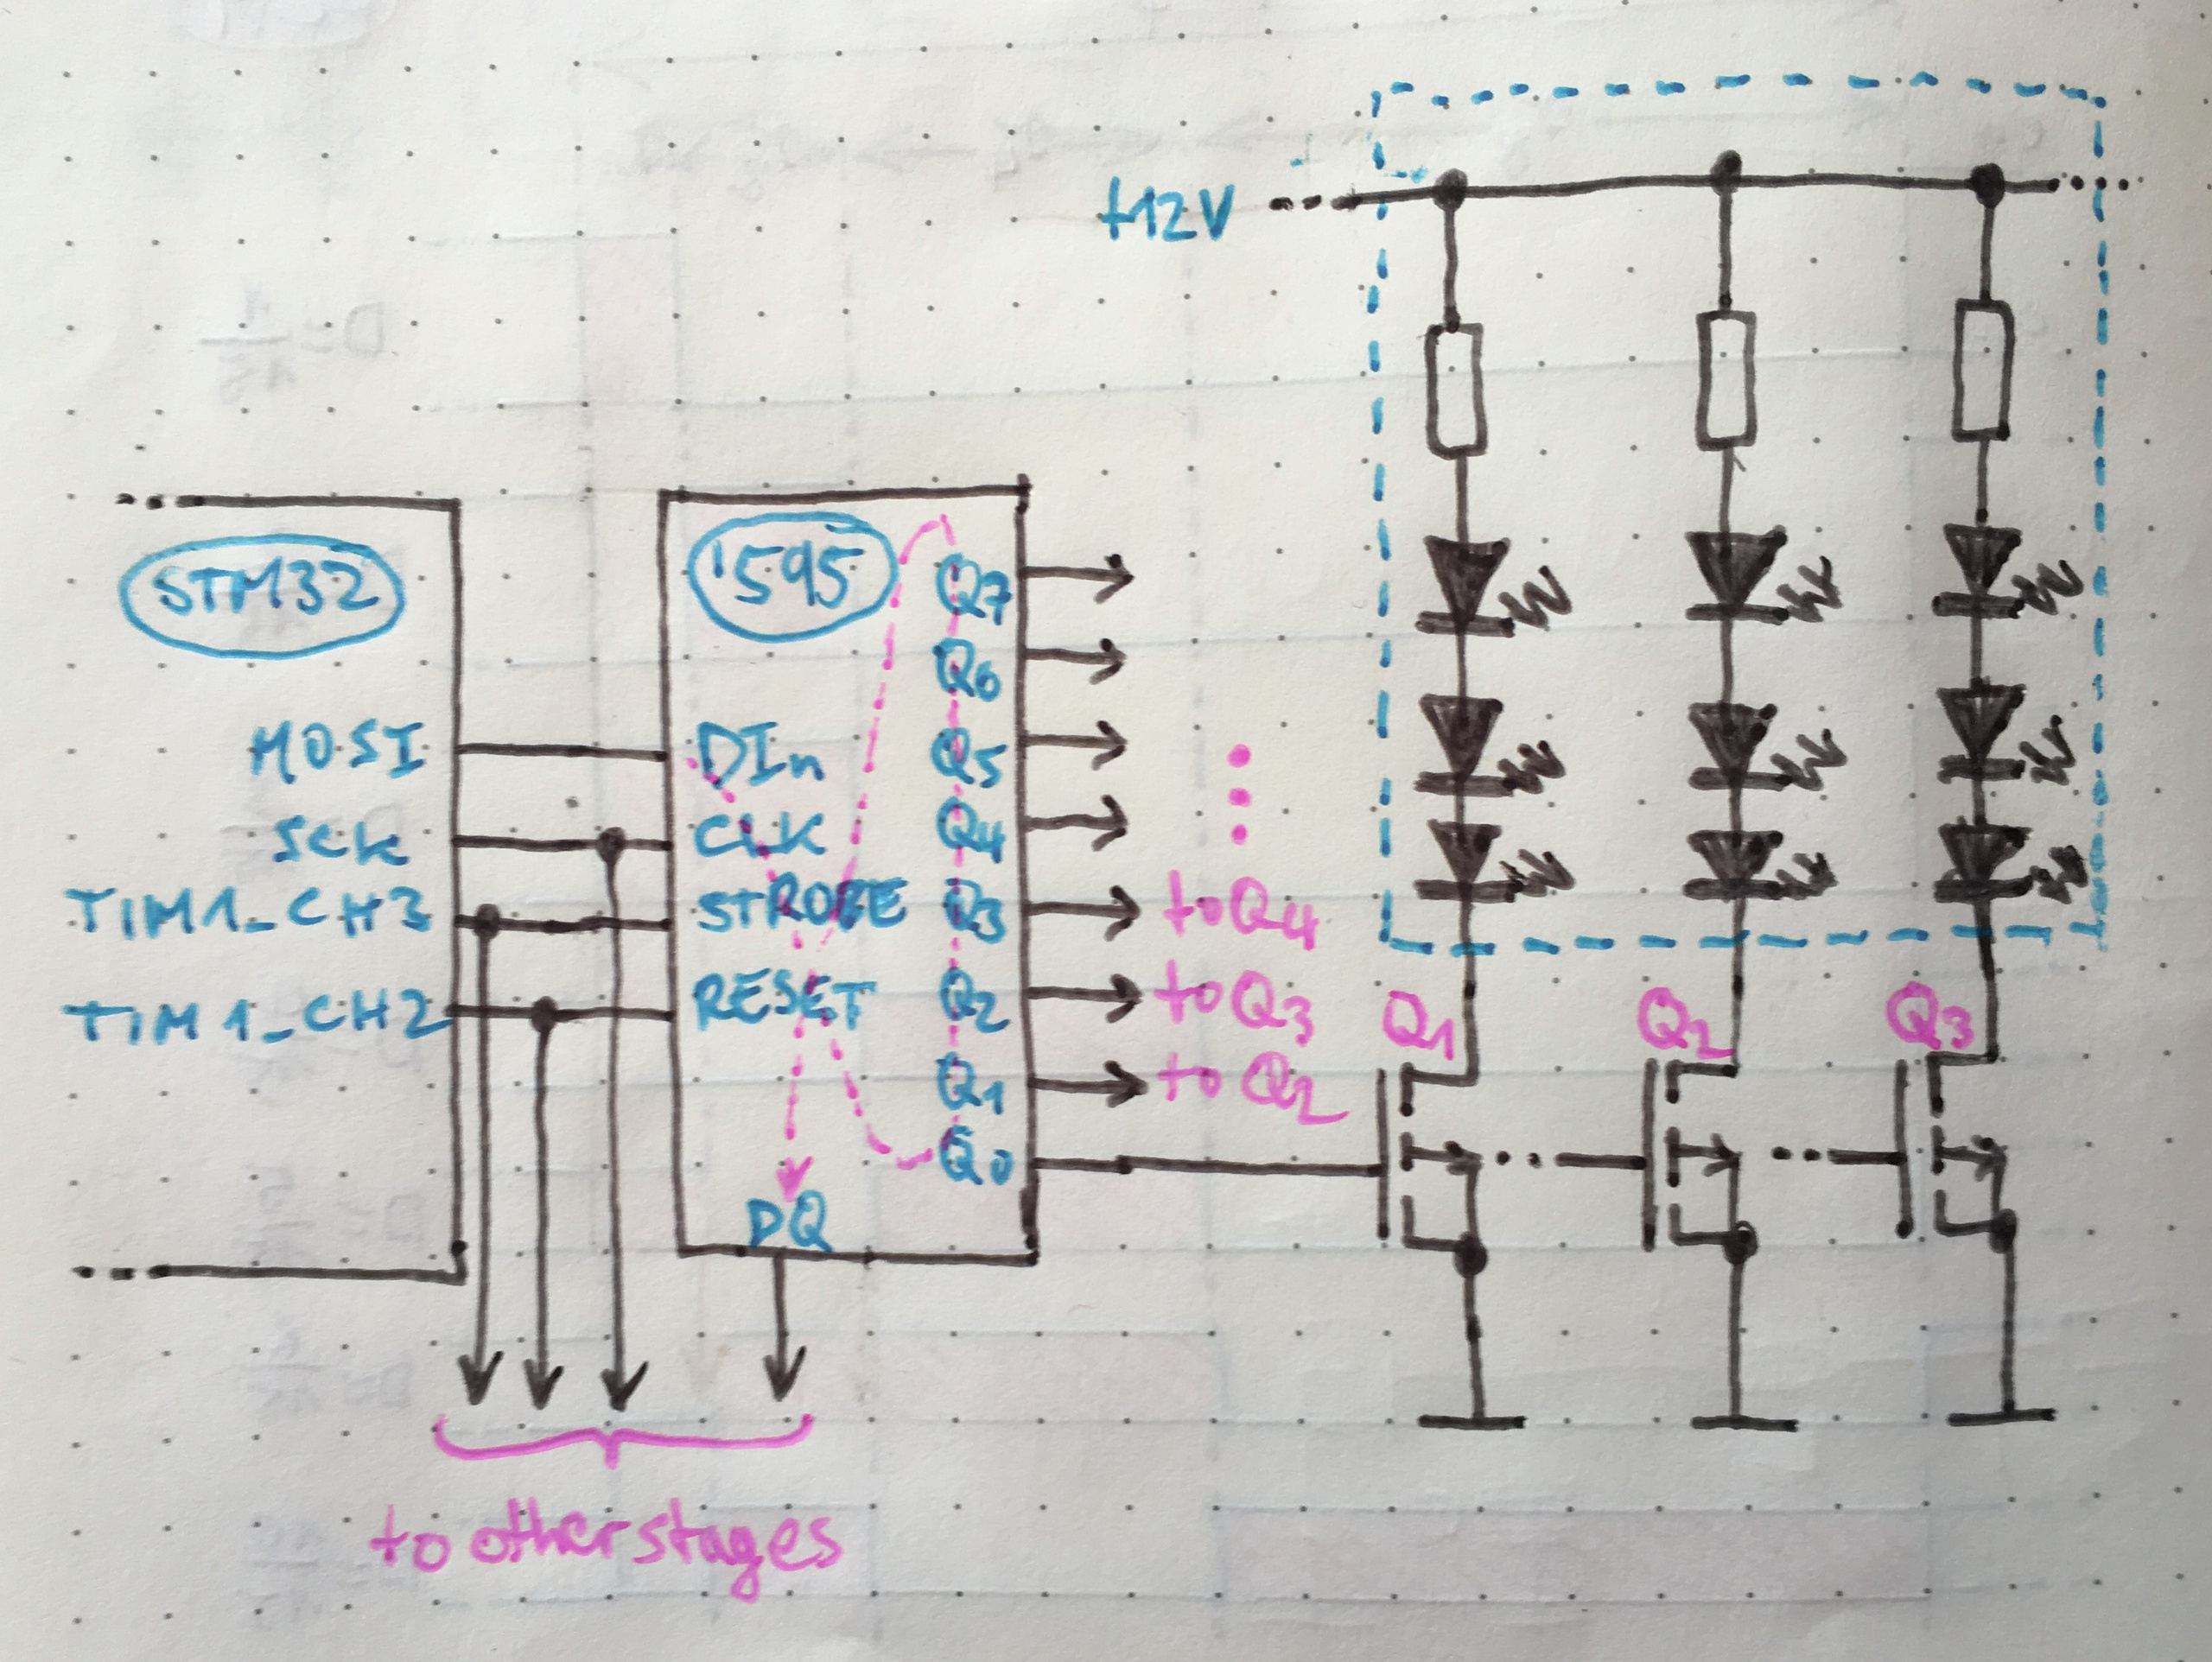
In our case, we don't need any special driver chips to control our LED tape. We just connect the outputs of a 74HC595
shift register to one MOSFET each, and then we directly connect the LED tape to these MOSFETs. The MOSFETs allow us to
drive a couple of amps into the LED tape from the weak outputs of the shift register.
The BCM timing is done by hooking up two timer channels of our microcontroller to the shift registers strobe and
reset inputs. We set the timer to PWM mode so we can generate pulses with precise timing. At the beginning of each
bit period, a pulse will strobe the data for this bit period that we shifted in previously. At the end of the bit
period, one pulse will reset the shift register and one will strobe the freshly-reset zeros into the outputs.
 The schematic of a single output of this LED driver. Multiple shift register stages can be cascaded.
Our implementation of this system runs on an STM32F030F4P6, the smallest, cheapest ARM microcontroller you can get from
ST. This microcontroller has only 16kB of flash and 1kB of RAM, but that's plenty for our use. We use its SPI controller
to feed the modulation data to the shift registers really fast, and we use two timer channels to control the shift
registers' reset and strobe.
We can easily cascade shift registers without any ill side-effects, and even hundreds of channels should be no problem
for this setup. The only reason we chose to stick to a 32-channel board is the mechanics of it. We thought it would be
easier to have several small boards instead of having one huge board with loads of connectors and cables coming off it.
The BOM cost per channel for our system is 3ct for a reasonable MOSFET, about 1ct for one eighth of a shift register
plus less than a cent for one resistor between shift register and MOSFET. In the end, the connectors are more expensive
than the driving circuitry.